 |
 |
|
|
Design
a Virtual Bridge...
Win a $10,000 Scholarship!
|
| West
Point Bridge Designer Tutorial |
| Let's
return to the Drawing Board and get started on the optimization process.
Because our bridge didn't collapse, it is a successful design.
But it is not an optimal design, because it is much more expensive
than it really needs to be. Designing an inexpensive bridge is not
as important as designing a safe bridge--but cost is still quite important.
A bridge might never get built, if it costs more than your state or
city can afford. |
|
|
On the
upper toolbar, notice that the cost of our design has already
been calculated at $202,560.39.
|
|
 |
|
To see how this
number is computed, just click the Report Cost Calculations button
(the little calculator) immediately to the right of the cost.
How can we reduce
the cost of the bridge without compromising its safety? One way
is to reduce the size of members that are stronger than they really
need to be. Remember that, in the previous load test, all five bottom
chord members were color-coded with a very light
blue. The light color indicates that, for each of these
members, the tension force was much less than the strength. As a
result, all five of these members can be reduced in size without
compromising the safety of the structure. In fact, you can reduce
their size from 120 mm to 90 mm, and the bridge will
still pass the load test.
|
|
|
In making
this modification to our structural model, let's take a little
shortcut. Since we have to change the size of five members,
let's use multiple selection to speed up the process.
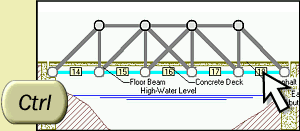
Hold down the Ctrl key on your keyboard, and then click
all five bottom chord members. All will be selected simultaneously,
as shown at right. Now choose 90 mm from the Member
Size list, and all five members will be changed to this
size.
|
|
 |
|
Notice that
the cost of our design has dropped to $196,929.06--a saving of over
$5000. The structure still passes the load test, so the reduction
in cost did not adversely affect the safety of the structure.
$5000 is a fairly
impressive cost saving, but we can still do a lot more to optimize
this design. Many other members can safely be reduced in size. We
might also find that we can save some money by using hollow tubes
rather than solid bars or by using a different type of steel. Use
the other two Member Properties lists to make these changes.
Just by making
well-reasoned adjustments to the member properties, you should be
able to reduce the cost of this bridge below $175,000. Give it a
try!
Remember that
size is not the only member property you can change. You
can also choose different cross-sections (hollow tubes vs.
solid bars) and different materials (three different types
of steel).
|
|
|
Optimizing
member selections is not the only way to reduce the cost of
a design. You can also change the shape of the truss
by dragging joints with your mouse, and you can add or delete
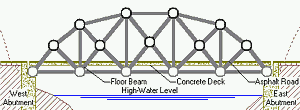
members. The drawing at right shows one possible configuration.
There are literally millions of others. You
might also try an entirely different site configuration.
|
|
 |
|
For detailed
instructions on all of these optimization strategies--and much more
useful information about bridges, engineering design, and the WPBD
software--click the Help menu on the upper toolbar. Select
How to Design a Bridge from the menu and carefully study
each of the steps outlined in the flowchart. Pay particular attention
to "Optimize the Member Properties," "Optimize the Shape of the
Truss" and "Find the Optimum Truss Configuration." These articles
contain a lot of helpful hints that will speed your search for a
successful, low-cost bridge.
Happy designing!
|
|
|


